Instructions for Printing Name Tags

Setting Up the Name Tag Printer
- Do this first -> plug the printer in and hit the power button on the side
- The power button is the middle button on the side
- It take a minute to warmup
- It should automatically connect to WiFi
Printing Name Tags with Dymo Connect App
- Now that you have the app connected with the printer, you should be on the App's home screen, so click Open Label and select NAMETAG
- Now the editor will show up.
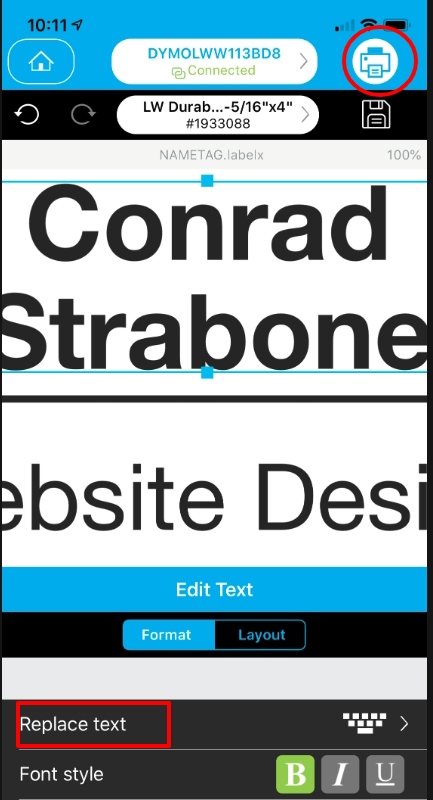
- Click on the Conrad's Name. A blue box will appear and near the bottom click on "Replace Text" (red box below) and a little edit window will open
- Delete Contad and enter the visitor's First Name and Last Name on separate lines
- Next click on Website Designer and below click on "Replace Text" and a little edit window will open
- Enter the visitor's profession or what they sell. Do not enter their job title.
- Next hit the white "print" icon in the upper right (red circle below)
- You'll see a preview and if it's correct, click the blue print button at the bottom, and the printer will begin printing.
- You should now be back on the Edit Label screen
- Finally, there is NO NEED TO SAVE the label. Leave it as a template for next week.
If the Printer Goes to Sleep
- The power button will be flashing and WiFi will be off
- Tap the power button to bring it back online
Adding New Roll of Labels
- Open the top and pull out the empty spool
- Add the new spool of labels which feed from the back and under the spool into the printer. The should be face down as they enter the printer.
- If the labels are in correctly the printer will grab it an line it up.
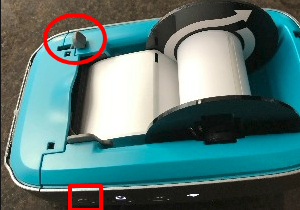
- If the printer didn't grab the spool, you can hit the forward button on the side (red square below). It's to the left of the Power button.
- If the printer still doesn't grab the labels, then lift the gray lever (red circle below) on the left if to give yourself a little space to insert the labels
Using the Samsung Tablet
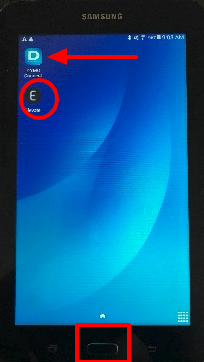
- Home button (red square below)
- Dymo Label App (red arrow below)
- Elevate Check-in Page (red circle below)
- Elevate Name Tag Instructions
Connecting Dymo App with Printer
- On the Home screen, click the Dymo Icon to open the label app
- If the printer is on, then the app should automatically connect to the printer
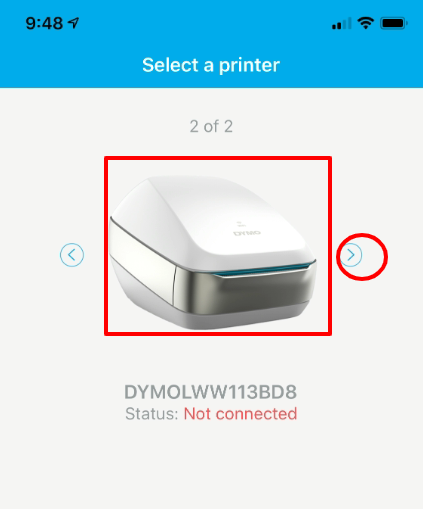
- If you get the Choose Printer Screen, hit the right arrow (red circle below) until you see DYMOLWW113BD8 and click on it's icon (red square below)
- It should connect, but if it doesn't, you'll get a green "reconnect" button below. Click that until it connects
Troubleshooting When Dymo Won't Connect to Printer
- If you open the Dymo App, but it goes to the WiFi screen you need to restart the app
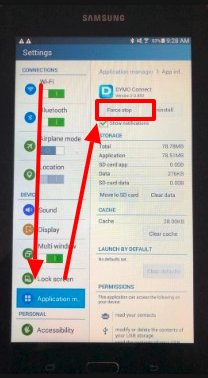
- On the Home screen, in the lower right, click Settings
- Click on Applications in the left column
- Click on Dymo in the right column
- Click on Force Stop and OK
- Now go back to the Home screen and open Dymo again
- Andf it should connect to the printer